Hello again friends. Today i will post a "tutorial" without picture. I've got this ideea surfing on internet. I found an interesting article and i thought to share with you, especially cuz I was faced with these issues once. Many people have problems and get frustrated when 3dsmax freezes because of too many polygons in a scene, the lighting setups, and advanced textures all loaded in the viewport, and you may be one of them. So I'm going to give you some tips on making 3dsmax run faster for you, and how you can work more efficiently with the program.
I divided the article into sections, which are the most common areas where problems occur.Section 1 - ViewportsIn this section, I will be giving you tips on how to make your 3dsmax viewport run faster and more efficiently.
Let's start with the viewports, probably the most vulnerable feature of 3dsmax to freeze up. I get so many questions from people who can't work on their scenes because they add too many meshsmooth or turbosmooth modifyers to their models, and they just aren't looking at those modifyers full options. When you add any subdivision modifyer to your models, preview it with just one itteration, if it looks somewhat good, then change it back to 0, and set your render itteration to 1 or 2, if the model in the render doesn't look smooth enough, then simply add more render itterations.
When you're working on major scenes (that have about a million or so polys, and a few hundred objects), and you are stuck trying to get around in the viewport which is traveling at a choppy 2 frames per second, then simply turn the viewport wireframe mode on (hotkey: F3). It should be easier to get around in, especially when you are previewing animations. Another good alternative to the wireframe mode is the box mode (hotkey: O). In this mode all the objects in the viewport appear to be 6-poly boxes and is virtually lag free. This is an ideal solution for people who have low-grade video cards.
Another big factor for disruption in the viewports is the lighting. Lights take up quite alot of your system memory, and a good trick for dealing with that is to (simply put) delete the lights...but BEFORE you do that, select the lights (individually if you have more than one) and press F12 to get their position co-ordinates. Make a new text document or something to paste your X,Y,Z co-ordinates and write down the light settings. This may be a little much just to free up some memory, but it's well worth it.
If you're viewport ever acts weird (such as models looking bright green and such) then why not change your viewport renderer? There are 3 options for it in 3dsmax, including Direct X, OpenGL, and Software. I recommend using D3D if you have an NVidia graphics card, they seem to perform well together. If you are using an ATI card, then go with OpenGL. If you are using card that doesn't perform as well (such as an integrated card), give all 3 a try. All options should work on any card, but some are more compatible than others).
Section 2 - Rendering
In this section I will be giving you tips on how to make your rendering methods faster and more efficient.
To start off, if you have a scene that has a great looking render, and you want to keep it (and you don't feel like redoing the settings every time you work on a new project), then all you need to do is save it as a render preset file (located at the very bottom of the render dialogue window, hotkey: F10). You can save everything from the actual render settings, to the environments/effects, and even the common settings.
A good key for rendering is to choose a specific renderer that you feel comfortable working with. I particularily use VRay as my renderer, but that is a 3rd-party plugin. If you have 3dsmax v6 or later, then you will have both Default Scanline, and Mental Ray already to choose from. What you should do is learn both renderers, get aquainted with their settings and capabilities, and use whatever is to your liking. For faster renders, go with Scanline, it is very quick and efficient. If you want to make a good looking render just add a skylight with light tracer (in the Rendering, Advanced lighting menu). It has great results and renders very fast. Mental Ray can make better looking images in a timely manner, but overall it renders much more slowly (not to say that it's a bad renderer, because it is very professional).
Quick tip: While doing tests renders (not finals) delete the lights in your scene (unless they are absolutely necessary). They are one of the longest things to compute while getting ready to render. Taking them out generally cuts my rendering time in half.
Section 3 - Getting to know 3dsmax
In this section I will be giving you tips on how to work with 3dsmax and getting to know shortcuts that will get you very far when working.
Some quick advice for new 3dsmax users, take the tutorials that are already preset with the program, they will get you farther than any other tutorials, and will teach you the basics of learning pretty much everything the program has to offer.
Another quick tip is to start using hotkeys and memorizing all of them. Here is a small list of some example shortcuts that I use all the time:
- F9: Quick Render- F10: Render Dialogue- Ctrl+C: Create new Camera (from current perspective)- F12: Positioning Dialogue
Hotkeys are a godsend to me, and I always use them when I'm working. It saves me a little time here and there and end up giving me more free-time in the end. I would definitely recommend that you look at the hotkey map and get to know which keys do what, it will more than likely make your experience with max a better one.
Another great feature that 3dsmax has in the XRef importing feature, which lets you import objects from other Max scenes and places them into your new one (and no, it doesn't affect the other scene at all). You can import ANYTHING from another scene (geometric data, lights, helper objects, etc.) with XRef. I use this option whenever I'm working on large scenes so that I don't have to model an object in the scene itself. (And yes, XRef does import the materials from objects so there's no need to retexture them).
Section 4 - Overall Performance
In this last section, I will be giving you tips on how to make 3dsmax run faster and perform better overall.
3dsmax loves RAM, and lots of it. Memory affects every aspect of how the program performs, such as the viewport, rendering, and animation. If you want it to perform better just get more ram. (I know it sounds inane, but it's a necessity).
If you already have alot of ram, but 3dsmax is still performing poorly (for some odd reason), then simply exit those other useless programs! Pretty much all graphics oriented software uses up alot of memory, and so do anti-virus/spyware programs, and instant messengers. Exit all of those programs while working inside Max. They affect how you work in the program and are consuming everything that 3dsmax needs.
Source: http://www.3dtotal.com/index_tutorial_detailed.php?id=765#.UNxs3-S6eSp
Merry Christmas to all. I felt, in this day of celebration, I want to give you a symbolic gift to those who read my blog and let me make a wish: many readers. Here's what I thought: Christmas Balls.
For every Christmas season, Christmas Balls is one of the most commonly used decor for many houses around the world. It's beauty and elegance helps bring abundant christmas spirit and joy to every family. This tutorial will show you how to create a Christmas Balls and hopefully inspire every one to have a good feeling and blessings this Christmas. It's very easy to create it.
Step 1: Create a Sphere in Top view with radius of 14 and 18 segments. Rename it to "Bubble".
Step 2: Right click on the bubble object and convert it to Editable Poly.
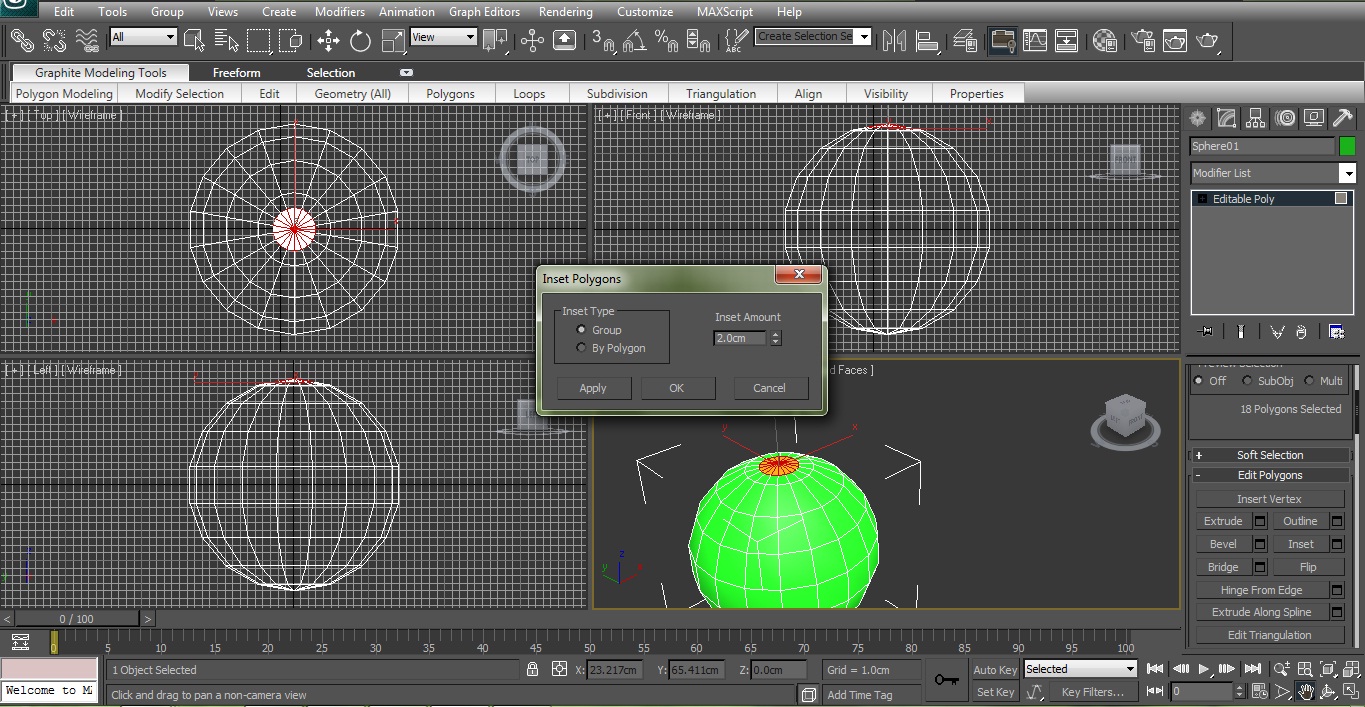
Step 3: Select the top polygons and hit Inset button in editable poly modifier. Change amount of Inset to 2 and hit OK.
Step 4: Click on Extrude button in Editable Poly modifier and change its Height to 0.2 and hit Apply and then again change its Height to 4 and hit OK. Now you can delete the top polygons.
Step 5: Apply TurboSmooth modifier to the bubble object. In turboSmooth parameters increase Iterations field to 2 and make sure Isoline Display is checked.
Step 6: Create a Cylinder in Top view and rename it to Cap. Make sure its settings is same as below picture.
Step 7: Right click on the Cap object and convert it to Editable Poly.Step 8: Select the middle vertices and with Scale tools move them out and let them be near to border of Cap.
Step 9: Select every third one of the bottom polygons same as below picture.
Step 10: Extrude selected faces with Height of 2.5.
Step 11: Apply TurboSmooth modifier to Cap object. Then you can reshape your Cap object as you like. I have added some more faces at top and make a curvy shape there.
Step 12: Finally create a hooky shape at top of the Cap. You can use Circle shape or Torus geometry. I used circle and using Select and Move tool I Positioned like in the picture.
Finally, attach it to the Cap object.
Well, the Bubble object is already created. You can make several copies and arrange them in your scene. Use the previous tutorial for rendering the christmas balls whenever you wish.
This is my final result! Hope you like it!
Hi everyone, this is my first 3D rendering tutorial for you. We will learn how to make a studio render using 3d Studio Max 2010 and Vray(most used 3d rendering engine). Learn this because you will use to render all your model epecially next model that I will suggest to you in my next tutorial. Next time we will cover the material part also. Enjoy!
Step 1: The first step for this 3d rendering tutorial is to assign Vray as your 3d rendering engine. First Open Max. After that from the main toolbar select Rendering and Render Setup (or simply pres F10 on your keyboard).
Step 2: With Render Setup window open, select Common and click on the 3 dots next to Default Scanline Renderer, chose Vray and click OK.
Step 3: In Top view create a Box. Go to command panel click on Create>Geometry select Box, click and drag to create it. Set the Length and Width of the box to 500cm and the Height of 1 cm.
Step 4: To create our light simply click on Create>Lights, now select VRay and VRayLight. In Left view click and drag to create our light. Set the Half-length and width to 140, change the Multiplier to 7, leave the color to white(if you want you can try a bright yellow or blue) and check the box for Invisible.
Step 5: Using Select and Move Tool and Select and Rotate Tool position your light like i've did below. Click on Angle Snap Toggle(activating this you will be able to rotate from 5 to 5 degrees only) and rotate it 45 degrees and then move it in the corner. Like I did in the image below.
Step 6: Create another box like we did in step 3, only this time change the Length to 400cm, the Width to 1 cm and the Height to 150cm. Use the tools we have used in step 5 and position it like i did in the next image.
Step 7: Now it's time to create our main objects for this 3D Rendering example. So go to Create>Geometry and make one Teapots with the Radius of 25cm, 12 Segments and move like i've did.
Step 8: Our 3d Rendering scene needs a Camera. So go to Create>Camera and select Target. In Top view click where the camera position will be, move and release where the focus/target point will apeare.
Step 9: Press "C" on your keyboard to go to Camera view and use the tools in the bottom right corner to change the position of the camera for a better view.
Step 10: Right click on Camera in the top left corner and click on Show Safe Frame to activated it. We will now see the exact 3D Rendering Region of our scense. Again, use those bottom right tools to align it.
Step 11: Click on Material Editor in the main toolbar, or pres "M" on your keyboard. Select the first material click on Get Material and from Materials>Vray select VRayMtl. Activate Show Standard map in Viewport.
Step 12: In main toolbar go to Select from Scene, Select Box 001 and 002 and click OK. Now from Material Editor click on Assign Material to Selection. Your two boxes are now Grey and have assigned the VRay material.
Step 13: We must create some reflective materials for our 3d Rendering scene so change the next material in Material editor with VrayMtl. Change our material color to Red. Change the Reflection color RGB to 150,150,150. Check the box for Fresnel Reflections and click on the L box next to it that will allow us to change the Fresnel IOR to 2.5 and the Max depth to 10. The Refl. glossiness must be 0.8.
Step 14: Apply material to the Teapot using Assign Material to Selection button.
Step 15: In the next images you can see my setting for VRay. Press F10 and change the Render Setup like i've did. For Image sampler(Antialiasing) change the Type to Adaptive DMC and the Antialiasing Filter to Catmult-Rom. In Adaptive DMC image sampler change the Max Subdivs to 8. In Color Mapping change the type to Exponential, check the box for Sub pixel mapping and Camp out. Now in Indirect Illumination check the box for "ON" to enable it, set the primary bounces to Irradiance map and secondary to Light Cache . For Iradiance Map change the Current Preset to Medium, check the box for Show calc. phase(check this in Light cache settings also) and Show direct light. In Setting change the Noise threshold for DMC Sampler to 0.05, Min samples to 16 and Global subdivs multiplier to 4. Set the Render region division to 32 for X and Y. If you don't want to see the Vray log every time you do a 3d Rendering test uncheck the box for Show window.
Step 16: This is what we have. Our 3D Render look's good so far. You can play freely with other settings to see differences in picture.
So, from this 3d modeling lesson you will learn how to create a volleyball ball in 3ds Max 2010. Let's start 3d modeling:
Step 1: From Create, Geometry select the Box. Create the box in top view. Go to modify panel. There, change the Length, Width and Height to 50cm. In Parameters rollout menu set the Length, Width and Height Segments to 3 and click Create.
Step 2: Right click on the box and select Conver to> Convert to Editable Poly.
Step 3: In the Modify tab go to Polygon selection mode, select the 3 polygons i've selected below, click on Detach, check the box for "Detach as Element" and click OK. Our Box has 6 faces so you need to do this 18 times(3 times for each face). In the next image you can see only first step(first 3 polygons), so do the exact same thing for the other 3 visible faces, and then the others 3 back faces.
Step 4: Add a Meshsmooth modifier from the Modifier List and change the Iterations to 2 or 3. I'm gonna go with 3 for a smoother result.
Step 5: Add a Spherify modifier, this time.
Step 6: Now add an Edit Poly modifier, select the Polygon selection mode, press CTRL+A to select all polygons and click the little box next to Bavel. Change the Bevel Height to 0.2cm and the Outline to -0.2cm.
Step 7: For the last step of this 3d modeling tutorial add another Meshsmooth modifier and change the Subdivision Method to Quad Output. Leave the Iterations to 1.
Step 8: The result:
Hello everyone. In this modeling tutorial i will show you how to create an unsophisticated Computer Desk using 3d Studio Max 2011. I will cover only the 3d modeling part. Let's move on.
Step 1: From Command Panel, Create, Geometry create a Box in Top View with Length 60cm, Width 140cm and Height 2.5cm.
Step 2: Create two more boxes in the Top view. The one on the left with Length 60cm, Width 40cm and Height 70cm. For the box on the right use this settings: Length 60cm, Width 30cm and Height 70cm. Now using Select and Move tool move the boxes around to align the to the first created box like i've did below. Use F3 to turn on/off wire frame view to see exactly what you are doing.
Step 3: Select any one of the 3 boxes. Right click on it and select Convert to>Convert to Editable Poly. In Command Panel go to Modify tab, click the box next to Attach, i new window will pop-up, hold down CTRL and select the other 2 boxes. Click Attach to attach all 3 boxes together.
Step 4: In Front view create a new box. Length 30cm, Width 70cm and Height 2.5.cm. Using the Select and Move tool align it to the rest of the boxes like i've did below. Attach this box too, like we did in previous step.
Step 5: In Modify tab go to Edge selection mode(shortcut key "2"), select the edges i've selected below. Select one and click Ring. Now Connect them. Click on the box next to connect, leave everything as default(1 segments, 0 pinch and slide) and click OK.
Step 6: Again, select the edges i've selected below and connect them with default settings. 1 Segment, 0 Pinch and Slide.
Step 7: Connecting the edges together in Step 5 and 6 resulted some new edges. Select two edges(one from every line) and click on Loop to make a loop selection. New click on Chamfer box and apply a chamfer with an amount of 0.1cm and 1 Segment. Press OK.
Step 8: Go to Polygon selection mode(shortcut key "4") and select 3 polygons like you see in the next image(don't select the polygons between them). Hold down SHIFT and using Select and Move tool move them just a little bit(0.1cm) in Y axis direction. A pop-up window will appear, select Clone to Object. Click OK.
Step 9: Press H on you keyboard to Select from Scene, select the Object and click OK. From the Modifier list apply a Shell modifier with an Outer Amount of 1.5cm. Convert the object to Editable Poly.
Step 10: Now do the exact same thing for the drawer in the right. First select the Polygon, holding down shift move it in front a little bit to create a clone and detach it, select it and apply a Shell modifier with and Outer Amount of 1.5cm. Convert it to Editable Poly.
Step 11: Select the desk and go to Polygon selection mode(shortcut key "4"). Select the margin Polygon and move it on to of the drawers like i've did below.
Step 12: For the inside sliding draw create a new box in Front view with Length of 1.5cm, Width 69cm and Height 40cm. Using Select and Move tool move it to fit the inside of the desk.
Step 13: With the new created box selected, right click on the screen and select Hide Unselected to hide everything else except sliding drawer box. From Create, Shapes select Line. Set the Initial and Drag type to corner and create a new Line like in the below image.
Step 14: Go to Modify tab and select Spline from selection rollout menu(shortcut key "3"). Select the spline by clicking on it or by pressing CTRL+A(select all). In the box next to Outline enter -0.1cm and press enter to create outline or simply click on outline move the cursor on to of the spline, click and drag until you achieve your desired result.
Step 15: From the modifier list apply an Extrude modifier to out Spline with an amount of 40cm. Now using the Mirror tool, mirror our object in X axis, Offset amount 69.164cm and Clone Selection Instance(every change you make to your object will be made to your mirrored object). Click OK.
Step 17: Continuing with this 3d modeling tutorial we will create the desk legs. In Top view press F3 to turn on Wire view. Create a new box with Length and Width 4cm and the Height of 8cm. Convert it to Editable Poly.
Step 18: Using all concepts learned so far I will ask you to create handles for desk's doors. I used simple single boxes, Extrude and Bevel. Good luck.
And now.... the final result!!! Hope you like it...
Go to the TOP of the page